My coll reopens today (05-09-07), so I've put an end to all my entertaining activities blogging, chatting, playing....and concentrate on studies. If I find time surely I will post new articles. I've learned many things from this blog. So I thank you all for supporting my blog.
See you all soon in next holiday. Till then keep a track on my blog - " Good Bye ".
I've deleated this post bcoz I've published the content from howtogreek.com without noticing the copyright ontheir page and without asking permission from them
So I appolgies for the work I've done
you can watch the contents of this post in following link
( Source )
I've deleated this post bcoz I've published the content from howtogreek.com without noticing the copyright ontheir page and without asking permission from them
So I appolgies for the work I've done
you can watch the contents of this post in following link
This useful article was taken from How to greek.com. I recommend you to visit their website for many useful informations, tips, tricks and many more.
To show Windows Vista "super hidden" files, that is, those files that are normally hidden from the user, you'll need to accesss the registry editor.
To turn on (or off) super hidden files: (make sure you backup the registry before making changes)
* Click the Start Button, type "regedit" (Registry Editor) in the search box, and press Enter
* Click Continue to get past the User Account Control hurdle
* On the left panel, double-click to navigate to the key:
HKEY_CURRENT_USER\Software\Microsoft\Windows\CurrentVersion\Explorer\Advanced
* On the right panel, double-click on Superhidden
* In the Value Data box, change the value to "1"
* Click OK
* Exit the Registry Editor
* Restart your machine for the changes to take effect

In our quest to make orkut universally accessible, we're now available in 5 new languages: Hindi, Bengali, Marathi, Tamil, and Telugu. Indians have always been a vibrant part of the orkut community, and we continue to see more Indians joining orkut every day. It's our goal to make orkut the ultimate tool for self-expression and communication, and we know that if we're not translated into your native language, this becomes harder. So we worked closely with Googlers in our Indian offices to help develop the initial release of these languages. Since there are many different nuances to these languages, we want to hear your feedback. To help us improve the translation or tell us what language you'd like to see orkut in, you can visit our community on orkut: Indian Language Translations. We chose these languages initially because together they cover 80% of India. We do recognize India has more than 400 different spoken languages, but think these 5 are a good start, and we hope that introducing orkut in these regional tongues brings us closer to many more of you to bridge the gap between language and technology. Viewing the orkut site in Hindi, Bengali, Marathi, Tamil or Telugu (or any one of our other 12 languages) is easy.
1. Click the settings button under your profile photo (or click the blue settings link at the top of any page).
2. On the general tab, choose your preferred display language from the drop-down menu at the top of the page.
3. Click save changes.
If you are having trouble reading languages on the "Settings" page, it is likely that your browser scripts have not been updated. For Internet Explorer, proceed to "Tools" and then "Windows Update". Here you should accept the Windows XP Service Pack 2 update. All languages are included in this update.
We hope this will help many more people enjoy orkut in their own language every day.
source: orkut Blog: orkut in Hindi, Bengali, Marathi, Tamil and Telugu!
As we all known Orkut changed completely with its now features and Style.
But,you have a widescreen monitor and orkut's new design doesn't look good on it.what you want to have is this
here is the solution for your problem .Just follow these steps one by one :
* Install greasemonkey extension for firefox if you have not already done so.
* Go to http://userscripts.org/scripts/show/11782 and click on the "Install this Script" link on the right side and restart firefox
Thats it ...now browse orkut.com and whole content should be resized to 99% of your screeen automatically. Special thanks for Gaurav Verma for fixing this bug
![]()
TransferBigFiles is the easiest way to share a bunch of files with friends, family or everybody in the world. There's no registration required to use the website. You can just go to the home page and start uploading some files. But to make the process even easier, we've created a Windows System Tray tool that allows users to drag-and-drop files to the site. We have not been able to find an easier tool for file sharing.
You can send files up to 2GB in single attachment. TransferBigFiles does not limit the amount of space your account can use on our servers, the only storage limit we have is that your files may not be larger then two (2) gigabytes. For a minimum of 5 days or up to 30-days if you upload through a registered DropZone account. DropZone users can also manage there files and expire them prior to 30-days.
For regular usage of this service you can use their client, if you want it.
TBF DropZone Client : It's the super-easy, super-fast, super-smart way to Transfer Big Files. It's FREE!
* System Tray Utility (for Windows)
* Drag 'n' Drop files to Send Files
* Auto-resume interruptions
* Upload up to 1gb per file
* 10-day Expiration
* Small footprint (~300kb)
* Fast, secure & reliable!
Below are my previous posts on sending big file
Pear 2 mail, Pando, You send it

What is Shareaholic ?
Share and send links directly from your browser.
Submit the web page you are currently viewing to digg, del.icio.us, facebook, google bookmarks, magnolia, reddit, stumbleupon, twitter. If you prefer, e-mail the web page directly to a friend instead.
*Bonus feature* - Real-time statistics from digg and del.icio.us. Check whether the web page you're on has been dugg, and how many times it has been saved on del.icio.us. Stats displayed in your browser, at your request.
Works perfect with Firefox 1.5 and above
Download this Shareaholic addon by bzzster.com
Google search engine can be used to hack into remote servers or gather confidential or sensitive information which are not visible through common searches.
Google is the world’s most popular and powerful search engine. It has the ability to accept pre-defined commands as inputs which then produces unbelievable results.
Google’s Advanced Search Query Syntax
Discussed below are various Google’s special commands and I shall be explaining each command in brief and will show how it can be used for getting confidential data.
[ intitle: ]
The “intitle:” syntax helps Google restrict the search results to pages containing that word in the title.
intitle: login password
will return links to those pages that has the word "login" in their title, and the word "password" anywhere in the page.
Similarly, if one has to query for more than one word in the page title then in that case “allintitle:” can be used instead of “intitle” to get the list of pages containing all those words in its title.
intitle: login intitle: password
is same as
allintitle: login password
[ inurl: ]
The “inurl:” syntax restricts the search results to those URLs containing the search keyword. For example: “inurl: passwd” (without quotes) will return only links to those pages that have "passwd" in the URL.
Similarly, if one has to query for more than one word in an URL then in that case “allinurl:” can be used instead of “inurl” to get the list of URLs containing all those search keywords in it.
allinurl: etc/passwd
will look for the URLs containing “etc” and “passwd”. The slash (“/”) between the words will be ignored by Google.
[ site: ]
The “site:” syntax restricts Google to query for certain keywords in a particular site or domain.
exploits site:hackingspirits.com
will look for the keyword “exploits” in those pages present in all the links of the domain “hackingspirits.com”. There should not be any space between “site:” and the “domain name”.
[ filetype: ]
This “filetype:” syntax restricts Google search for files on internet with particular extensions (i.e. doc, pdf or ppt etc).
filetype:doc site:gov confidential
will look for files with “.doc” extension in all government domains with “.gov” extension and containing the word “confidential” either in the pages or in the “.doc” file. i.e. the result will contain the links to all confidential word document files on the government sites.
[ link: ]
“link:” syntax will list down webpages that have links to the specified webpage.
link:www.expertsforge.com
will list webpages that have links pointing to the SecurityFocus homepage. Note there can be no space between the "link:" and the web page url.
[ related: ]
The “related:” will list web pages that are "similar" to a specified
web page.
related:www.expertsforge.com
will list web pages that are similar to the Securityfocus homepage. Note there can be no space between the "related:" and the web page url.
[ cache: ]
The query “cache:” will show the version of the web page that Google
has in its cache.
cache:www.hackingspirits.com
will show Google's cache of the Google homepage. Note there can be no space between the "cache:" and the web page url.
If you include other words in the query, Google will highlight those words within the cached document.
cache:www.hackingspirits.com guest
will show the cached content with the word "guest" highlighted.
[ intext: ]
The “intext:” syntax searches for words in a particular website. It ignores links or URLs and page titles.
intext:exploits
will return only links to those web pages that has the search keyword "exploits" in its webpage.
[ phonebook: ]
“phonebook” searches for U.S. street address and phone number information.
phonebook:Lisa+CA
will list down all names of person having “Lisa” in their names and located in “California (CA)”. This can be used as a great tool for hackers incase someone want to do dig personal information for social engineering.
Google Hacks
Well, the Google’s query syntaxes discussed above can really help people to precise their search and get what they are exactly looking for.
Now Google being so intelligent search engine, hackers don’t mind exploiting its ability to dig much confidential and secret information from the net which they are not supposed to know. Now I shall discuss those techniques in details how hackers dig information from the net using Google and how that information can be used to break into remote servers.
Index Of
Using “Index of ” syntax to find sites enabled with Index browsing
A webserver with Index browsing enabled means anyone can browse the webserver directories like ordinary local directories. The use of “index of” syntax to get a list links to webserver which has got directory browsing enabled will be discussd below. This becomes an easy source for information gathering for a hacker. Imagine if the get hold of password files or others sensitive files which are not normally visible to the internet. Below given are few examples using which one can get access to many sensitive information much easily.
Index of /admin
Index of /passwd
Index of /password
Index of /mail
"Index of /" +passwd
"Index of /" +password.txt
"Index of /" +.htaccess
"Index of /secret"
"Index of /confidential"
"Index of /root"
"Index of /cgi-bin"
"Index of /credit-card"
"Index of /logs"
"Index of /config"
Looking for vulnerable sites or servers using “inurl:” or “allinurl:”
a. Using “allinurl:winnt/system32/” (without quotes) will list down all the links to the server which gives access to restricted directories like “system32” through web. If you are lucky enough then you might get access to the cmd.exe in the “system32” directory. Once you have the access to “cmd.exe” and is able to execute it.
b. Using “allinurl:wwwboard/passwd.txt”(without quotes) in the Google search will list down all the links to the server which are vulnerable to “WWWBoard Password vulnerability”. To know more about this vulnerability you can have a look at the following link:
http://www.securiteam.com/exploits/2BUQ4S0SAW.html
c. Using “inurl:.bash_history” (without quotes) will list down all the links to the server which gives access to “.bash_history” file through web. This is a command history file. This file includes the list of command executed by the administrator, and sometimes includes sensitive information such as password typed in by the administrator. If this file is compromised and if contains the encrypted unix (or *nix) password then it can be easily cracked using “John The Ripper”.
d. Using “inurl:config.txt” (without quotes) will list down all the links to the servers which gives access to “config.txt” file through web. This file contains sensitive information, including the hash value of the administrative password and database authentication credentials.
For Example: Ingenium Learning Management System is a Web-based application for Windows based systems developed by Click2learn, Inc. Ingenium Learning Management System versions 5.1 and 6.1 stores sensitive information insecurely in the config.txt file. For more information refer the following
links: http://www.securiteam.com/securitynews/6M00H2K5PG.html
Other similar search using “inurl:” or “allinurl:” combined with other syntax
inurl:admin filetype:txt
inurl:admin filetype:db
inurl:admin filetype:cfg
inurl:mysql filetype:cfg
inurl:passwd filetype:txt
inurl:iisadmin
inurl:auth_user_file.txt
inurl:orders.txt
inurl:"wwwroot/*."
inurl:adpassword.txt
inurl:webeditor.php
inurl:file_upload.php
inurl:gov filetype:xls "restricted"
index of ftp +.mdb allinurl:/cgi-bin/ +mailto
Looking for vulnerable sites or servers using “intitle:” or “allintitle:”
a. Using [allintitle: "index of /root”] (without brackets) will list down the links to the web server which gives access to restricted directories like “root” through web. This directory sometimes contains sensitive information which can be easily retrieved through simple web requests.
b. Using [allintitle: "index of /admin”] (without brackets) will list down the links to the websites which has got index browsing enabled for restricted directories like “admin” through web. Most of the web application sometimes uses names like “admin” to store admin credentials in it. This directory sometimes contains sensitive information which can be easily retrieved through simple web requests.
Other similar search using “intitle:” or “allintitle:” combined with other syntax
intitle:"Index of" .sh_history
intitle:"Index of" .bash_history
intitle:"index of" passwd
intitle:"index of" people.lst
intitle:"index of" pwd.db
intitle:"index of" etc/shadow
intitle:"index of" spwd
intitle:"index of" master.passwd
intitle:"index of" htpasswd
intitle:"index of" members OR accounts
intitle:"index of" user_carts OR user_cart
allintitle: sensitive filetype:doc
allintitle: restricted filetype :mail
allintitle: restricted filetype:doc site:gov
Other interesting Search Queries
· To search for sites vulnerable to Cross-Sites Scripting (XSS) attacks:
allinurl:/scripts/cart32.exe
allinurl:/CuteNews/show_archives.php
allinurl:/phpinfo.php
· To search for sites vulnerable to SQL Injection attacks:
allinurl:/privmsg.php
allinurl:/privmsg.php
Source
A simple text file edit makes sites redirect to another. When you type address in address bar in any browser and enter it then it will display another web page, for example:- when you type Google.com you will be redirected to yahoo.com
Instructions to do:
1) Go to this directory [c:\windows\system32\drivers\etc], directory may change according to drive used for os installation
2) then hit enter
3) find a file named "hosts"
4) Right click on it and open with word pad.
5) In the last link of the document type the IP* address of yahoo space www.Google.com (Vice versa for other sites)
6) now save it
7) restart the browser if its already running
8) Now try it, It works perfect
IP*: to find IP address of that website Goto start ->Run > type cmd > enter. Now you have a new window on desktop. On that type this without cotes "ping www. yahoo.com"
replace yahoo.com with your preferred site and then enter it
Live example:
How To Hack Google - The best home videos are here
Recover Option: Repeat the first four steps and remove the last line that you have inserted and save it and restart browser. Now its back to normal
try this on your frieds pc and public pc and make them blink.
Low hard disk space but high speed internet with unlimited transfer, then its not a problem
The table below shows the top 25 online backup companies in the world. Our ranking is based on a number of factors.
Here are some of the major criteria that we strictly followed to come up with these top 25 companies:
* Security
* Software Features
* Software Ease of Use
* Speed
* Reliability
* Uptime
* Quality and Accessibility of Technical Support
* Cost per MB per month
The Top 25 Online Backup Companies for August 2007 are:
1. www.mediamax.com
2. www.mozy.com
3. www.box.net
4. www.carbonite.com
5. www.ibackup.com
6. www.novastor.com
7. www.datadepositbox.com
8. www.evault.com
9. www.intronis.com
10. www.file123.com
11. www.filesanywhere.com
12. www.remote-backup.com
13. www.backup-technology.co.uk
14. www.omnidrive.com
15. www.amerivault.com
16. www.livevault.com
17. www.BeInSync.com
18. www.backupsolutions.com
19. www.quantumrbs.ca
20. www.drivehq.com
21. www.dataprotection.com
22. www.titanize.com
23. www.vaultlogix.com
24. www.sosonlinebackup.com
25. www.bitleap.com
Sourse

When you think Google, you picture primary colors; when you think orkut, you see blue. And though Orkut updating the look, Orkut staying true to blue. Orkut added some rounded corners and new icons that make orkut look a little more sleek and modern. This makes users to use default without searching for skins Check out a screen shot of the new homepage.
Orkut rolling it out to groups of users at a time over the next week.
New features in Orkut
![]() Installing a theme
Installing a theme
* Download a theme from the website.(Download Link)
* Extract the files in this .ZIP file to your desktop ( for example, with Winzip )
* If there is an executable between the files you extracted, run it.
This will install the theme for you. You're done.
* If you can't find an executable, you need to install the theme manually.
The theme is located in a folder you just extracted. Look for a folder with the same name as the theme.
Once you have found this folder, you need to move it to the directory where Google Talk stores all its themes.
This is C:\Documents and Settings\USERNAME\Local Settings\Application Data\Google\Google Talk\themes\user\chat.
USERNAME needs to be replaced with your windows username. Move the entire theme folder to this location. Using the theme
* Start Google Talk if it's not already running.
* Now open your settings window by clicking 'Settings'.
* Select 'Appearance' from the left menu
* Your theme should appear in the list, if not, you did something wrong.
Select the theme and click OK.
* Open a conversation window and watch the magic.
Shortcuts
* CTRL + Mousewheel up/down over input textbox: Change the font size of the textbox.
* F9: Open Gmail to send an email to your friend
* F11: Start a call with your friend
* F12: Stop the current call
* ESC: Close the current window
* ALT + ESC: Minimize the current window
* TAB: Switch between multiple chat windows
* CTRL + I: Same as TAB
* SHIFT + TAB: Same as TAB but in reverse order
* CTRL + TAB: Same as SHIFT + TAB
* Windows + ESC: Open Google Talk (if it's minimized, or in the tray)
Conversation Text
* A message can be 32767 characters long.
* Certain smileys are recognized by Google Talk and will be shown in blue.
:-| :-O :-x :-P :-D ;-) :-( :| :O :x :P :D :) :( ;-| ;-O ;-x ;-P ;-D ;-) ;-( ;| ;O ;x ;P ;D ;) ;( B-| B-O B-x B-P B-D B-) B-( B'( BO Bx BD B) B( B) And you can put a ' between the characters to get another one shown in blue.
* To write text in bold, put it between *asteriks*
* To write text in italic, put it between _underscores_
* You can insert special characters like ♥♫☺ with 'Start / Programs / Accessories / System Tools / Character Maps'.
Conversation Window
* Drag a conversation window on top of another and they will dock together.
* Drag a file onto the chat history and you'll send the file to the selected contact.
* When you see a message notification, you can right click it to close it without focusing the conversation window.
Conference Calls
* What you need to do to have conference calls: Open up a copy of Google Talk on all computers with which you wish to conference. After one copy is opened make a new shortcut for Google Talk but at the end of it add /nomutex. If you installed it to the default folder then your shortcut should read "C:\Program Files\Google\Google Talk\googletalk.exe" /nomutex. Open 2 instances of the software on every user's computer. After this start a chain: User 1 should connect on one instance to user 2. User 2 will connect on his second instance to user 3. User 3 will connect using his second instance back to user 1. With this chain everyone is connected to everyone.
Nickname & Status Message
* You can change your name in the Google Account page.
or To change the nickname need to go to your Gmail account and change the name there. Choose Settings, Accounts, and then Edit info. Click on the second radio button, and enter your custom name.
As a result all of your emails will have that nick as well, there is no way to seperate the two.
* You can add a website in your custom message, it will be clickable when someone opens a conversation window with you.
Contacts
* You don’t need to say Yes or No when someone wants to add you as a friend; you can simply ignore it, the request will go away. (On the other hand, someone with whom you chat often will automatically turn to be your friend, unless you disable this).
* The Gmail account 'user@gmail.com' can't be invited as your friend.
Sound & Video
* It's possible to broadcast music, MP3, etc.. through Google Talk.
Unplug your microphone. Double click on the speaker icon in the lower right corner. This will open
up "Volume Control". Select "Options" and then "Properties". Then check the button
next to "Recording" then click OK. You may also have to change your setting under
Mixer Device. Now the Recording Control screen should be up. On my computer I selected "Wave Out Mix". Click on the green phone in Google Talk and call your friend.
Secret Startup Parameters
* /nomutex: allows you to open more than one instance of Google Talk
* /autostart: when Google Talk is run with this parameter, it will check the registry settings to see if it needs to be started or not. If the "Start automatically with Windows" option is unchecked, it won't start.
* /forcestart: same as /autostart, but forces it to start no matter what option was set.
* /S upgrade: Used when upgrading Google Talk
* /register: registers Google Talk in the registry, includig the GMail Compose method.
* /checkupdate: check for newer versions
* /plaintextauth: uses plain authentication mechanism instead then Google's GAIA mechanism. Used for testing the plain method on Google's servers.
* /nogaiaauth: disables GAIA authentication method. The same as above.
* /factoryreset: set settings back to default.
* /gaiaserver servername.com: uses a different GAIA server to connect to Google Talk. Used for debug purposes only, there are no other known GAIA servers.
* /mailto email@host.com: send an email with Gmail
* /diag: start Google Talk in diagnostic mode
* /log: probably has something to do with the diagnostic logging
* /unregister: ?
* /embedding: ?
Others
* If there’s something you think is missing in Google Talk, send off a message to Google.
* There was a hidden game in Google Talk. In the about screen you could see 'play 23 21 13 16 21 19 . 7 1 13 5'. Each number represented a letter. a=1, b=2, c=3 .... When you translated this message it said: 'play wumpus.game'. To play this game you had to invite wumpus.game@gmail.com as a friend. wumpus.game@gmail.com is always offline now. You can still play Hunt the Wumpus here.
* Google Talk can dock into the Google Desktop Sidebar. Doubleclick on the titlebar in the Google Talk main window and it docks as a panel into the GDS and slides out when you click the top of the docked panel.(Source)
Internet users who live in a country outside the United States would usually get limited country slot error when trying to download files from Mega upload. Mega upload requires the visitors to install the Alexa tool bar to proceed downloading and it will be quite troublesome if we’re using public computer or prefer not to install information gathering software like the Alexa Tool bar. There are several ways to solve this either by using US based proxy or by applying some tweaks to your computer/internet browser which is the most effective method this time. Those tweaks are:
Mozilla Firefox 2.0.0.5 tweak:
1. Go to address bar and type about:config . Press enter
2. Look for general.useragent.extra.firefox using the filter and double click on it
3. Change the default text with this: Firefox/2.0.0.5 MEGAUPLOAD 1.0
Windows Registry tweak (for Internet Explorer 7 and Internet Explorer 6):
1. Open run in the start menu and type regedit. Press enter.
2. in Registry Editor window, go to [HKEY_LOCAL_MACHINE\SOFTWARE\Microsoft\Windows\CurrentVersion\Internet Setting\5.0\User Agent\Post Platform]
3. Right click on ‘Post Platform’ and add new string value. Enter “Alexa Toolbar”. Save the registry and restart your computer.
note: For IE 7.0 the “Post Platform” will be located at:
[HKEY_LOCAL_MACHINE\SOFTWARE\Mcft\Windows\CurrentVersion\Internet Settings\User Agent\Post Platform]
I have Tested it and working. Just try this trick
This is a simple guide on how to use proxy with Mozilla Firefox Browser:
If you use proxies, you can:
a) download as many time you like using Rapidshare.de
b) Use Megaupload if your country slot is limited.
c) Enhance your privacy (no one can whois you)
d) Avoid hacker
e) Download faster (some proxies containe internet cache)
To get free proxies, go here
How to setup proxy:
Older Version: Go to tools>option>general>connection
Latest Version: Go to tools>options>advanced>network>settings
Enter setting like this screenshot: make sure that you change the proxy address.
I knew a lot of us here use Rapidshare to download and share a lot of stuff. It's quite annoying when we were unable to download for a certain period after downloading a big file. What are going to be shared to day is how to download from Rapidshare using proxy so that you won't have to face the 1 hour limitation problem again.
The programs that we need are a browser with ability to use proxy. I use Slimbrowser for two reasons:
1) I don't want to delete my Firefox or IE cache and cookies files.
2) It's very lite and not a resource hogger
Steps:
1. Download the browser from this location. Install it.
2. Get a proxy list here. This trick requires the usage of proxy server to work. So don't skip this step. Grab one proxy or more!
3. This is how you are going to setup your proxy
:Click Tools > Proxies > Organize Proxies
- In the Name field, enter something to identify your proxy, for example, Brazil #1
- In the first address field, enter the proxy address you got from Proxy4Free,
for example, 200.162.195.62
- In the second address field, enter the proxy port, for example, 3128
- If you want to set the entered proxy as the default proxy, then click the
Set As Current Proxy button
- Click OK to close the dialog box
* If you want to add more proxies, repeat the steps above again and again.
4. After you have setup the proxy, copy and paste the Rapidshare download link to your
browsers’ address bar, and wait for the Rapidshare page to launch.
5. In Rapidshare website, do the followings:
- Press enter and scoll down to bottom and click the FREE button
- Wait until the counter reaches zero or use any auto-reveal-link-utility
- Copy paste the download link into your favorite download manager, for
example, Flashget
- Download the file happily
Troubleshooting
Note that if Rapidshare gives you error like this;
This IP is not allowed to use free anonymous services.. or Your IP, xxx.xxx.xxx.xxx is downloading a file…
It's time to use another proxy!!! In Slimbrowser, go to menu, Tools > Proxies and select another proxy you already entered before
6) After downloading a file, don’t forget to clear your trace!
In Slimbrowser go to menu Tools > Internet Options to open the Internet Options applet
Click both Delete Cookies and Delete Files button to wipe out all references to Rapidshare. If you need to download more files, repeat all steps from 1 to 6, and hopefully you’ll be happier than ever.
Tips:
1. Do not choose proxy with port 80
2. Avoid choosing proxies addresses <195 because some of them are slow.
Windows 7 is a Microsoft future operating system expected to be released windows-seven-wallpaper in early 2010 or later. Formerly codenamed Black comb, and then Vienna, it’s no longer a secret that Microsoft has started working on this operating system since the release of Windows Vista.
Long Z; the designer of the famous Vista Aurora wallpaper recently has created Windows 7 wallpaper pack for anyone who is interested to Vienna.
The unofficial logo concept was his idea and the wallpaper pack was shared by Frank on deviant art.
Simple, pretty, and Microsoftish. That’s how I would describe this set. The wallpaper is available in different screen resolutions and you can download them here.
This GreaseMonkey Script for Orkut adds a link to RSS feed of current users scrapbook or community posts in top header menu of Orkut!
Look at following screenshots for quick understanding…
Following can be seen whenever you will be navigating any orkut users profile, scrapbook, album, friend-list, etc…
ORKUT RSS Feed for Scrapbook
Similarly following can be seen whenever you will be navigating any community… be its forum, poll, member-list, etc…
ORKUT RSS Feed for Community
Now whenever you will click on above links you will be redirected to relevant RSS fee, which you can add to a RSS Reader like Google Reader. (see following screenshot)
FIREFOX RSS Feed Subscribe Options
If you are good at math then you can realize all you need is one-click to reach any Orkut users scrapbook or community!
Also for advance firefox users, the RSS Link will be integrated into orkut so that you can get RSS indicator in navigation/address bar as shown in following screenshot.
FIREFOX RSS Feed Indicator
The RSS indicator is context sensitive and will automatically point to scrapbook or community RSS depending on which page you are! Clicking on it will again take you to Firefox Feed Subscription page as shown above!
Installation Instructions:
> Install Firefox(If you dont have click on the firefox installation button in side bar)
> Install Grease monkey add-on
> Restart the Firefox
> If you are in Firefox and already installed Grease monkey Add-on, then Click here to install the script!
> Restart Firefox again
> Its Ready to use
Source: Devils Workshop

As you certainly know, the right mouse button brings up what is known as the “context menu.” As the name implies, the choices available on the menu differ according to the current situation.
Well, here are 5 tips involving context menus that you may not know.
On thing you may not have noticed is that one item in every context menu is usually presented in bold. This is the default action that is taken when the left mouse button is used.
Tip #1: If you are ever in doubt about what will happen when you double-click on something (with the left mouse button), then use the right mouse button to bring up the context menu, and look for the item in bold.
Right-click also works with click and drag operations. Try this the next time you do a click and drag: Instead of clicking with the left mouse button, and then dragging the object, use the right mouse button. When you finished dragging (i.e. when you do the drop), a context menu will appear (a different one, specifically for dragging). This shows you all of the actions that are available for the combination of the object that you are dragging and the location you have dragged it to. Once again, the default action will be shown in bold. This is the action that normally occurs when you use the left mouse button to do the click-and-drag.
Tip #2: If you are ever in doubt about what will happen when you click-and-drag an object (with the left mouse button), then use the right mouse button to perform the dragging, and then look for the action that is in bold.
When might you be in doubt? Well, in the case of dragging files around within the Windows Explorer, two of the possible actions are Move and Copy. These two take turns being the default action, depending on the drop zone. If you are dragging a file to a different location on the same to disk drive, then Move is the default action, but if you drag it to a different to disk drive altogether, then Copy is the default action.
Another option available when using drag-and-drop in Windows Explorer is to create a shortcut to the object, rather than copying or moving the object itself.
Tip #3: Use right-click-and-drag to quickly create a shortcut to an object on your desktop. This will leave the actual object in its original (proper) location, yet give you convenient access to it from the desktop.
Tip #4: A corollary to Tip #3 — Using right-click-and-drag to create shortcuts is particularly handy when dealing with batch files. When you create a shortcut to a batch file it gives you more control over executing the batch file then simply double-clicking on the batch file itself. This is because the shortcut contains adjustable properties specifically for this purpose. So, after creating a shortcut, right-click on the shortcut, select the Properties option, and then adjust them as necessary.
Tip #5: Have you ever accidentally dragged an object to the wrong location? Just as you let go of the mouse button, your hand twitches, and the cursor ends up in the next file folder over. Depending on how much work it was to select the files being dragged (perhaps with lots of Ctrl+Click and Shift+Clicks), this can be a real nightmare. The solution to this is to use the right mouse button to do the dragging. When you let go of the right mouse button, the context menu pops up. One of the choices there is Cancel. The destination gets “locked in” when you let go of the mouse button, so if the wrong location is locked in, then all you have to do is click on Cancel and try the drag again. Otherwise, go ahead and select the action that you wanted to perform in the first place. (Probably the one in bold.) source
 7-Zip is a rock-solid file archiver for Windows with a high compression ratio. It is the premier archiver for the LZMA compression format (a.k.a. 7z). Indeed, the 7-zip web site is also the home of the LZMA SDK (Software Development Kit).
Compared to WinRAR 3.50, CAB ARC 5.1, win zip 10.0 beta (maximum-PP Md), win zip 10.0 beta (maximum-portable) this software have high compression rate and it saves more space, system requirements are also mininmal
Version 4.42 of 7-zip has been a workhorse for over a year. The just-released 4.47 (beta) offers these improvements:
* New fast compression mode for Deflate method in Zip and GZip.
* New “Compress shared files” option in GUI and -ssw switch.
* Some bugs were fixed.
* New localization: Norwegian Nynorsk. The main features of 7-Zip are:
* High compression ratio in new 7z format with LZMA compression
* Supported formats:
o Packing / unpacking: 7z, ZIP, GZIP, BZIP2 and TAR
o Unpacking only: RAR, CAB, ISO, ARJ, LZH, CHM, Z, CPIO, RPM, DEB and NSIS
* For ZIP and GZIP formats, 7-Zip provides a compression ratio that is 2-10 % better than the ratio provided by PKZip and WinZip
* Self-extracting capability for 7z format
* Integration with Windows Shell
* Powerful File Manager
* Powerful command line version
* Plugin for FAR Manager
* Localizations for 63 languages
Download from 7-Zip

 A modern PC with Vista Home Edition takes about one and a half minutes to boot. An older machine with XP is about the same. That’s 30 seconds for the PC itself (the BIOS) to boot up, plus a minute for the Windows operating system to boot. Sometimes, you need to reboot Windows (e.g. when installing new software), but there is no need to restart BIOS, too. However, the default is to reboot both. (That’s called doing a “cold boot,” rather than a “warm boot.”) There’s a trick that works on both XP and Vista to get it to do a warm boot instead, thus saving you 30 seconds per cycle.
The trick is to hold down the SHIFT key when invoking the restart.
Windows Vista: Select Start, then hover over the right arrow that is to the right of the padlock icon until the pop-up menu appears that contains “restart” as one of it’s choices. Hold down the SHIFT key while clicking on the “restart” choice.
Windows XP: Select Start. Select “Shut Down…”. Change the drop-down combo box under “What do you want the computer to do?” to “Restart”. Hold down the SHIFT key while clicking on the “OK” button. source
Another social network
YouMint is a unique social utility that connects you with people around you. Only real people! YouMint pays you to invite friends and to receive SMS promos! It might just pay your Mobile bill :-)
You mint offers services as fallows
Send free SMS to any one in India
Get paid for inviting friends and get more promo.
Create and sell mobile contents to friends like wallpaper, screen saver,etc..
Get paid for receiving adds on your mobile
get paid for your friends receiving adds on their mobile
Contact with friends via personal messages
and many more
Confused on how they pay us? OK, here’s how it works
- What you get each time you get a promo SMS – Rs 0.20
- What you get when a friend you referred get a promo – Rs 0.10
- What you get when a friend of the friend you referred gets a promo – Rs 0.05
So therefore, if you have lots of friends, who have a lot of friends, you could make a lot of money each time a promotion is done. Even if we send everyone 1 promo a day, you stand to earn Rs. 666 every month. OK, OK, here’s the math again
- What you make for receiving 1 promo a day for a month : 1 promo x 30 days x Rs.0.20 per promo = Rs 6
- What you make when a friend you referred gets a 1 promo a day for a month: 1 promo x 30 days x Rs.0.10 per promo x 20 friends = Rs 60
- What you make when a friend of a friend you referred gets 1 promo a day for a month : 1 promo x 30 days x Rs.0.05 per promo * 400 friends (assuming each of your twenty friends successfully referred 20 friends each)= Rs.600
So, Rs 6 + Rs 60+ Rs 600 adds up to a cool Rs 666!
Signup now and start earning {Click hear}
Other Social network like youmint are adMAD, MobiK and many more
 Now Orkut allows Images and html code on Scrap, many friends asking me to give nice website for collection of animation, images, etc..
So I decided to suggest some animation sites service providers, try the links below
Image Generators: imageGenerator.net provides you with an easy way to add text to various images, allowing you to create a funny picture, or to illustrate a joke. You can save these pictures online and send them to your friends, or show them on your favorite message board or website.
Animation Factory: 500,000 Animations, Animated Clip art, Motion Designs for Video, PowerPoint, Flash, Websites, E-mail and more!. Use our unique animations, Flash designs, video elements, PowerPoint templates, sounds, music, and backgrounds to bring your projects to life! Become a member of Animation Factory and immediately start downloading from our huge library. Hundreds of new items added every week.
Best Animations: Best Animations is a collection of free animated gifs found on the web. Except where indicated with an asterisk all animated gifs are believed to be free to use. If an asterisk appears next to an animation then you must check the copyright restrictions posted on the site linked at the bottom of the page where the animation appears. Please notify the webmaster if you see a copyrighted animation that is not credited.
Animation Library: the NEW Animation Library, a site featuring over 13,748 free animations for you to use on your website or send as digital postcards using our powerful Postcard Station. While you are browsing the Animation Library, you can listen to great music by using the Jukebox. To navigate our site, just use the Links in the menu below and on the sidebar to select animation you want to see. Enjoy your visit!
Gif animations: This is the Internet's original and largest collection of free animated GIFs. Right here, you have access to more than 20,000 animations, clipart and backgrounds. Price tags are not included and no registration is ever necessary. You can put this site on your browser's Favorites menu right now. Just press CTRL + D (works for most browsers). Then come back often to check out the new images that have been added.
Free animations: All the animations are free to download and use on your websites, emails and desktops. Many of the free animations and graphics have been created by the Webmaster, so you know you are getting original images. The 3D Words and messages are especially interesting. These have been created by the Webmaster using several types of software as listed in the disclaimer.
Animation Gold: large collection of free animation and clipart that you can download for free. Our archive of animation and clipart includes lots of new animated gifs and clipart you've probably never seen before. We will continue to make new animation and add it to our site. Click the free animation link at the left and it will take you to our animation page where you will find the animation menu listed by category.
Animation Central: Welcome to animation central where we serve up hundreds of free animations on the best free animated gif archive on the net today.
fg-a.com: Everything Needed To Build Or Enhance Your Web Site.
Browse for Animated Gifs, Clipart, Animations, Backgrounds and more
Animation station: best animations, backgrounds, graphics on net
Zwani: No Popups... No Spyware... No Spam! Just 1000's of Comments & Graphics To Use Everyday! Zwani.com is THE place to get all of the comments and graphics you could ever need for use on Myspace, friendster, Hi5, Myeeos, your website, friends blog or any other place you want to add a little comment or graphic. From comments and quotes to backgrounds, page codes and glitter graphics we have it all!
Pimp Hi5: this site provides Hi5 comments, glitters, animation, graphics, layouts, backgrounds, icons, falling hearts and many one
and you can find more website on Google search. Just click hear
 Did You Know......
Your computer is tracking all your actions and stores the evidence into your hard disk. Anyone else can see where you have been on Internet and the images, movies you have seen, even everything you did on your computer would leave traces on your computer, Perhaps you stumbled onto one or two adult Web sites. Perhaps by accident. Perhaps on purpose. And you don't want your husband/wife, dad/mom, boss/colleague or anyone else to know you've been there.
You can clear your history or empty your cache file in your browser's settings, but it will not protect you, some files can not be Erase.
Now its simple Single Click Complete Erasing! With only one click, Internet
History Eraser can clean up every trace of your Internet activity! Just
Choose what you want to erase, then click the Erase, and Internet History
Eraser will automatically remove all traces of your internet history!
[ Download trial ]
[ Crack ]{provided by Ben}
Keystroke logging (often called keylogging) is a diagnostic tool used in software development that captures the user's keystrokes. It can be useful to determine sources of error in computer systems and is sometimes used to measure employee productivity on certain clerical tasks. Such systems are also highly useful for law enforcement and espionage—for instance, providing a means to obtain passwords or encryption keys and thus bypassing other security measures. However, keyloggers are widely available on the Internet and can be used by private parties to spy on the computer usage of others.
Writing software applications for keylogging is trivial, and like any computer program can be distributed as a trojan horse or as part of a virus. What is not trivial however, is installing a keystroke logger without getting caught and downloading data that has been logged without being traced. An attacker that manually connects to a host machine to download logged keystrokes risks being traced. A trojan that sends keylogged data to a fixed e-mail address or IP address risks exposing the attacker.
lets see some of the key logger's what I known
Local Keylogger Pro 3.1 - Local Keylogger Pro allows you to monitor all users' activity on any computers in real time and record each computer's usage history. Local Keylogger Pro makes it easy to view, in real time, the screenshots of the any computers, all typed keystrokes, visited Web sites, used programs. You can view a list of running processes and terminate undesirable ones. Local Keylogger Pro can record all user activity to the log file. This information can be exported to HTML for convenient viewing in your web browser, or exported to MHT file for analysis. This allows you to see how long users worked with particular programs, how much time they spent on Internet, what sites they visited, what they typed in e-mails or chats.[Download][Crack]
XP Advanced Keylogger 2.5 - XP Advanced Keylogger is a top-rated invisible easy-to-use surveillance tool that records every keystroke to a log file. The log file can be sent secretly with email or FTP to a specified receiver. It can also detection specified keywords and take a screenshot whenever one is typed, displaying findings in a tidy log viewer. It causes no suspicious slowdowns and takes very few system resources. all this is happening in full stealth mode so the person you are monitoring will never be aware of it.{Windows 95, NT4, 98, Me, 2000, XP} [Download][Crack]
Blazing Tools Perfect Keylogger 1.67 - Perfect Keylogger is a new generation keylogger which is absolutely undetectable. It was created as an alternative to very expensive commercial products like iSpyNow, Spector Keylogger or E-Blaster. It has the same functionality, but is significantly easier to use. Complex internal mechanisms are hidden from the user behind the friendly interface. You can install Keylogger and immediately use it without changing of its settings.
Perfect Keylogger is an extremely compact, award-winning tool. It is translated into 20 languages and is increasingly popular around the world! It lets you record all keystrokes, the time they were made and the application where they were entered. It works in the absolutely stealth mode. Stealth mode means that no button or icon is present in the Task Bar, and no process title is visible in the Task Manager list.
Also, Perfect Keylogger can carry out visual surveillance. It periodically makes screenshots in invisible mode and stores the compressed images on the disk so you can review them later.
Perfect Keylogger was the first keylogging software solution which can be absolutely invisible in the Windows NT/2000/XP/Vista Task Manager![Download][Crack]
SC Keylogger Pro V3.2 - A Commercial Key Logger is a program that captures and logs keystrokes as they are entered on the computer for the purpose of monitoring the user. The logged data, which may be encrypted, is saved or sent to the person who installed the key logger. These applications often run in stealth mode and are invisible to the user that is being monitored. Such key loggers are sold commercially and may be used legitimately if deployed by authorized administrators and disclosed to the persons being monitored, as in a business environment. The use of a key logger to monitor persons without their knowledge has been ruled illegal in at least one jurisdiction.[Download]
Hook Keylogger v2.1 - Small and stealth keylogger without an installer; simplest keylogger possible Specify log file location Uses a WH_JOURNALRECORD hooking procedure to capture everything typed Hide and unhide the interface by pressing Ctrl+Shift+F7 [Download][Crack]
Advanced Invisible Keylogger 1.8 - Advanced Invisible Keylogger is an stealth spy tool, the best spy software offered by ToolAnywhere! Advanced Invisible Keylogger runs silently at the lowest level of Windows capturing every keystroke including usernames and windows log-on passwords.
Advanced Invisible Keylogger can also capture active window text, text typed in all popular instant messengers including AOL, YAHOO, ICQ, MSN and AIM.
All Desktop activity will be recorded through Advanced Invisible Keylogger’s secret! Have reports sent to your email address at anytime secretly! Advanced Invisible Keylogger is so stealthy and hides so well that not even a computer technician with years of experience can detect it running!
The most powerful stealth program at a most affordable price! An easy-to-use stealth solution for PC and Internet surveillance. Purchase your copy today and feel safe and secure.[Download]
This is my previous post on Key logger
visit this to
Firefox add-on for your Google reader feeds![]() The Google Reader Watcher extension is based on one of my Grease monkey script, which name is Google Reader Checker
The Google Reader Watcher extension is based on one of my Grease monkey script, which name is Google Reader Checker
With the Google Reader Watcher extension you can check your feeds regularly, you can see which feeds have unread news. You can open the Google Reader directly from the status bar and not at last, you can configure the extension to login with your Google Account automatically.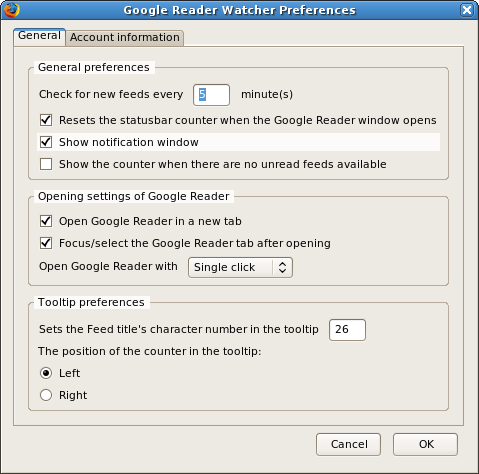
Download Google Reader Watcher Add-ons for Firefox
for more details on this add-on visit this page
You can easily change the orkut style using Firefox in two different ways, for both methods you have to install the Firefox add-ons and then install the script created to change style
First Method: I've already made a post on this method click hear or hear to see it
Second Method: This method also need Firefox 1.5 or above, Install the Firefox if you don't have and fall ow the instructions below
> Install the Stylish Firefox add-on from this page ( Click hear )
> Install the add-on. Once the add-on is install, restart Firefox so the add-on is activated
> Now you can find stylish icon in status bar of your browser, then go to Orkut.com
> click on Stylish icon and select "Find Styles for this page"
> Now you will get different styles to change look of your orkut
> Select the style you want and click "load into style" to install the style in orkut
thats it you have done it
want to see an example, click to enlarge
this is my homepage styled like office 2007, I took this script from this page
Easy links for more scripts visit this page
Learning Telnet
::Don't use this for illegal stuff::
Introduction:
Telnet is used to connect to remote machines through emulation. This means that
it can connect to a server, any server instantly because of it's ability to emulate (copy)
remote computers.
Lets Start:
In Windows, Telnet can be found by going to Start -> Run and then typing telnet.
The application should then pop up. If you don't have Windows, there are many Telnet alternatives for mac, linux etc. Since I don't know any,search the internet for Telnet for Linux or Telnet for Mac and you should find something instantly.
If you have a PC and are using Windows 98/95, 2000, Me, or XP continue...
As you can see, Telnet has 4 menu options. These are Connect, Edit, Terminal, and Help.
If you click Connect, you should see more options. Here they are.
Connect:
Remote System..
Disconnect
Exit
Names of servers you have been on.
To connect to a server, click Remote System...
This will then take you to a dialog box that has these fields:
Hostname:
Port:
TermType:
There should also be a Connect button and a Cancel Button.
Lets go over these & what you should put in them.
-Hostname-
The Hostname can be the address of the website your going to be connecting to:
http://www.google.com
or it can be the IP address. Keep in mind that you can only connect to servers and not to clients (other PCs)
an IP Address looks like this: 64.233.167.99
-Port-
Port can bb either the port number you wanna connect to on the server (Port 80 is the Internet, Port 23 is Simple Mail Protocol then there are some more ports for different things..)
or you can keep it Telnet and see what happens.
-TermType-
TermType is the type of Terminal telnet will be acting like.
This doesn't matter most of the time, so you can keep it to default or try other ones if you want.
When you have all this set up, you can Click Connect & see what happens.
Note: Sometimes many servers don't like anon people just logging on, so be careful when logging onto servers, because sometimes it might be some big company that likes bullying people or just SOMEONE who likes bullying people and then they might want to find you or trace you or something and I know for a fact you don't need that happening.
Another Note: When you go to a server and type something, such as a login name or a password, you might not see anything even though you are typing. this is a feature that telnet or the other server uses. It's for some kind of safety measure.
Ok that's all for the Connect Menu, lets go over the Terminal menu.
The terminal menu should have 3 options:
Prefernces
Start Logging
Stop Logging.
-Prefernces-
If you go to this, a dialog box will come up with various options. Here, you can change the
text color & background color of the program, and you can enable Local Echo, which shows
you everything you've typed, Blinking cursor if you want the cursor to blink check it, if not un check, Block cursor if you want the cursor to be shown as a block, VT100 Arrows, don't worry about these they are useless, Buffer Size, this allows you to set the number of lines of text you want to be shown before the screen starts to scroll, The Terminal emulation type, always have this set on the default unless you know what the second one is and you know what your doing.
-Start Logging-
This logs everything you do on Telnet in a log file on your computer.
-Stop Logging-
This will stop logging processes.
Well that's it for basics of telnet. Thanks for reading.
For complete Guide on telnet visit happy hackers guide for telnet, Telnet: the Number One Hacker Tool is the guide title, from this guide really you can become a hacker
Getting Ip's:--
To see the ip all computers you are connected to (web servers, people attempting to hack into your computer).
Go to dos (start>run>type command) and run the netstat command. Type netstat /? for details.
Type netstat -r at the command prompt to see the ip of all computers you are connected to
In MSN (and other programs) when you are chatting to someone everything you type goes through the MSN servers first (they act as a proxy) so you see their ip rather than who you are chatting to. You can get round this by sending them a file as MSN doesn't send file through its proxy.
When you type the netstat -r (or -a for a different view) the ip's are under the foreign address table. The ports are seperated by a : . Different programs use different ports, so you can work out which ip's are from which program.
Connecting to other computers and what ports are:--
Servers send information. Clients retrieve. Simple.
Windows comes with a built in program to connect to other computers called telnet.
To start Windows telnet Start menu> Run> type Telnet. Click connect> remote system
Ports are doors into computers. Hosts are computer names
(ip number or a name that is translated into the ip automatically)
Different programs open different ports, but they always open the same ports so other computers know which port to connect to. You can get a port list listing all the different ports, but a basic one is:
11 :- Sends info on the computer
21 :- FTP (File transfer program)
23 :- Telnet (Login to the computers command line)
25 :- Smtp (Sends mail)
80 :- Http (Web pages)
There are thousands of different programs using different ports. You can get programs called portscanners which check a computer for all ports up to a certain number, looking for ways in. You can portscan a computer looking for ways-in.
Anyway, back to telnet.
Type www.yahoo.com as the host and port as 80 the click connect.
If nothing happens, you're in. Wow. You are connected to Yahoo's server.
You can now type http commands (you are connected to an http server, so it supports http commands). Ie. on an ftp server you can type open and it will do something. On an http server it will just wonder what the hell you are on about.
Type get / http/1.0 then press enter twice to get the file on the server at / (try /index.html) etc.)
Allowing dos and regedit in a restricted Windows
A very simple tactic I found after accidentally locking myself out of dos and regedit is to open notepad and type the following:
REGEDIT4
[HKEY_CURRENT_USERSoftwareMicrosoftWindowsCurrentVersionPoliciesWinOldApp]
"Disabled"=dword:0
[HKEY_CURRENT_USERSoftwareMicrosoftWindowsCurrentVersionPoliciesSystem]
"DisableRegistryTools"=dword:0
Save it as something.reg then run it. Simple.
Proxies
Proxies are computers that you connect through, hiding your computer. Most aren't anonymous, they give away your ip. Some are. Good anonymous proxies: mail.uraltelecom.ru:8080 and 194.247.87.4:8080.
Different programs require different ways of using proxies. To do it in internet explorer 5 go to tools, internet options, connections, settings. In the above proxies they are in the format host:port
This summary is not available. Please click here to view the post.
To provide maximum viewable space in the Firefox browser window, many people use a streamlined Firefox layout which I will detail here. The difference between the default and the streamlined view is shown below: Click to enlarge
 As you can see, the streamlined view retains all the main functionality of Firefox, but reconfigures the layout to be as minimal as possible. Follow these steps to implement it:
1. Open Firefox, go to the View menu, select Toolbars and untick the 'Bookmarks Toolbar' item.
2. If you have a Sidebar showing, under the View menu select Sidebar and unselect any items.
3. Under the View menu select Toolbars and then select Customize. Alternatively you can right-click on an empty spot on a toolbar and select Customize.
4. In the 'Customize Toolbar' box which appears, select Icons in the Show box (not 'Icons and Text', or Text). If you're running a lower screen resolution also tick the 'Use Small Icons' box.
5. Now remove every icon or element in the Firefox toolbar at the top of the browser which you don’t need. For example, drag and drop the Search box into the 'Customize Toolbar' box to remove it from the Firefox toolbar. Do the same for any other icons/elements which you feel are unnecessary, such as the large white space filler at the top right of the Navigation toolbar. You can always re-add these elements at any time if you change your mind later on.
6. Now drag and drop each icon in the bottom Firefox toolbar up to the top toolbar, just to the right of the 'Help' menu item. This includes the large white Address box. The aim is to have everything on a single toolbar.
7. Insert any additional icons, separators or blank spaces you need from the selection shown in the 'Customize Toolbar' box into the relevant spots on the top Firefox toolbar. When finished, click the Done button.
8. Finally, go to the View menu, and under Toolbars unselect the 'Navigation Toolbar' as it should now be completely empty anyway.
You should now have a single Firefox toolbar at the top of your browser, complete with all the menu commands, relevant icons and the address box. This gives you more vertical viewable space (and a substantial amount of horizontal space if you had a sidebar showing). If you need more, go to the View menu and untick the 'Status Bar' item as it is not vital, and provides a further bit of vertical viewable space.
Obviously this layout may not suit everyone, and can be modified to suit your taste. However once you get used to it, it is extremely efficient and provides maximum viewable space in Firefox. Note that you can further customize the layout by looking under the Advanced Tweaking section.
Source: This site provides complete tutorial on fiefox tweeks and all of them are kuel, If you are Firefox user don't miss it click hear
here are some good tweeks that make the browsing super fast. To use them go to the search bar and type about.config
To edit settings bellow use these steps:
1. Open Mozilla FireFox
2. In the address bar type: about:config or about:plugins for plugin paths
Below are tweaks, which categorised into each computer situation
Quick Settings
user_pref("network.http.pipelining", true);
user_pref("network.http.pipelining.firstrequest", true);
user_pref("network.http.pipelining.maxrequests", 8);
user_pref("nglayout.initialpaint.delay", 0);
These are settings that enable Pipelining which makes firefox do multiple data requests at once, which speed things up a bit.
All Configurations
user_pref("network.http.pipelining", true);
user_pref("network.http.proxy.pipelining", true);
user_pref("network.http.pipelining.maxrequests", 8);
user_pref("content.notify.backoffcount", 5);
user_pref("plugin.expose_full_path", true);
user_pref("ui.submenuDelay", 0);
Fast Computer Fast Connection
user_pref("content.interrupt.parsing", true);
user_pref("content.max.tokenizing.time", 2250000);
user_pref("content.notify.interval", 750000);
user_pref("content.notify.ontimer", true);
user_pref("content.switch.threshold", 750000);
user_pref("nglayout.initialpaint.delay", 0);
user_pref("network.http.max-connections", 48);
user_pref("network.http.max-connections-per-server", 16);
user_pref("network.http.max-persistent-connections-per-proxy", 16);
user_pref("network.http.max-persistent-connections-per-server", 8);
user_pref("browser.cache.memory.capacity", 65536);
Fast Computer, not so fast connection
This configuration is more suited to people without ultra fast connections. We are not talking about dial up connections but slower DSL / Cable connections.
user_pref("content.max.tokenizing.time", 2250000);
user_pref("content.notify.interval", 750000);
user_pref("content.notify.ontimer", true);
user_pref("content.switch.threshold", 750000);
user_pref("network.http.max-connections", 48);
user_pref("network.http.max-connections-per-server", 16);
user_pref("network.http.max-persistent-connections-per-proxy", 16);
user_pref("network.http.max-persistent-connections-per-server", 8);
user_pref("nglayout.initialpaint.delay", 0);
user_pref("browser.cache.memory.capacity", 65536);
Fast Computer, Slow Connection (dial-up)
user_pref("browser.xul.error_pages.enabled", true);
user_pref("content.interrupt.parsing", true);
user_pref("content.max.tokenizing.time", 3000000);
user_pref("content.maxtextrun", 8191);
user_pref("content.notify.interval", 750000);
user_pref("content.notify.ontimer", true);
user_pref("content.switch.threshold", 750000);
user_pref("network.http.max-connections", 32);
user_pref("network.http.max-connections-per-server", 8);
user_pref("network.http.max-persistent-connections-per-proxy", 8);
user_pref("network.http.max-persistent-connections-per-server", 4);
user_pref("nglayout.initialpaint.delay", 0);
user_pref("browser.cache.memory.capacity", 65536);
Slow Computer, Fast Connection
user_pref("content.max.tokenizing.time", 3000000);
user_pref("content.notify.backoffcount", 5);
user_pref("content.notify.interval", 1000000);
user_pref("content.notify.ontimer", true);
user_pref("content.switch.threshold", 1000000);
user_pref("content.maxtextrun", 4095);
user_pref("nglayout.initialpaint.delay", 1000);
user_pref("network.http.max-connections", 48);
user_pref("network.http.max-connections-per-server", 16);
user_pref("network.http.max-persistent-connections-per-proxy", 16);
user_pref("network.http.max-persistent-connections-per-server", 8);
user_pref("dom.disable_window_status_change", true);
Slow Computer, Slow Connection
We have entered the doldrums of the dial-up user
user_pref("content.max.tokenizing.time", 2250000);
user_pref("content.notify.interval", 750000);
user_pref("content.notify.ontimer", true);
user_pref("content.switch.threshold", 750000);
user_pref("nglayout.initialpaint.delay", 750);
user_pref("network.http.max-connections", 32);
user_pref("network.http.max-connections-per-server", 8);
user_pref("network.http.max-persistent-connections-per-proxy", 8);
user_pref("network.http.max-persistent-connections-per-server", 4);
user_pref("dom.disable_window_status_change", true);
Download Manager Hacks
This next group of hacks deal with the download manager in Firefox. For those of you that don’t use the Firefox download manager, skip this section.
Follow these steps to tweak/destroy your manager.
1. With Firefox up and running, type about:config and hit enter.
2. Take your pick of the following attributes to modify.
3a. browser.download.manager.showAlertInterval at default shows the alert message for 2000 milliseconds or 2 seconds. I personally set it to 500 milliseconds; all I need is a quick blurb telling me my download is done.
3b. browser.download.manager.openDelay at default opens up the download manager immediately, which can be a big pain if you are downloading 10Kb files to your desktop, you don’t need that annoying manager to pop up. I have this guy set on 30,000 milliseconds or 30 seconds. If a file is larger than 30 seconds of download time, I might want to watch its progress.
3c. browser.download.manager.closeWhenDone at default is set to false so that your manager doesn’t close itself. I set it to true just to get this thing out of the way the moment it is done, I like to watch progress, but I don’t need to waste space or the time to close it.
3d. browser.download.manager.flashCount at default flashes the download manager icon in your taskbar for 2 seconds, I prefer zero seconds to reduce annoyance, adjust to your preference.
4. Restart your browser.
Cache Hack
This next hack deals with the memory Firefox uses as cache. In the default setting, Firefox will adjust the cache size to fit however many pages you have open. While this is useful, if you tend to only have a few pages open at a time, you can manually reduce the setting to a specified amount at the cost of reducing performance when Firefox runs out of cache. To implement this hack, follow these steps.
1. With Firefox up and running, type about:config and hit enter.
2. Right click on the new page and select New -> Integer.
3. In the pop-up window, type in “browser.cache.memory.capacity”. In the following pop-up window, specify how many Kb of ram you want to dedicate to the cache, I selected 32768(32Mb). I suggest a number between 16Mb and 64Mb, anything lower and performance will suffer, anything higher is excessive. Here you should experiment, or don’t bother if it worries you.
4. Restart your browser
I don’t know how much this helps or hurts performance, so far with 32Mb enabled I have yet to see a major difference, memory use dropped from 42Mb to 39Mb with the same pages open, but I don’t think this hack is what did that.But I'm not sure if its useful or not
The first hack that I have here is the popular Firefox Minimize Hack that has recently flashed through the internet. The purpose of this hack tries to keep Firefox from eating up your physical RAM and instead puts the burden on your hard drive, or at least that is the general reason behind it. To implement this hack, perform the following steps.
1. With Firefox up and running, type about:config and hit enter.
2. Right click on the new page and select New -> Boolean.
3. In the pop-up window, type in “config.trim_on_minimize” without quotes and hit enter.
4. In the next pop-up window, select True and hit enter.
5. Restart your browser
With that done, open up a bunch of tabs and monitor the memory usage. In my first run without this hack, Firefox was using 137.8 Mb of Ram. With all 30 tabs open again, Firefox was using 118.4 Mb, but when minimized this dropped to an astounding 4 Mb. However, this was too good to be true, I left Firefox minimized and came back 12 minutes later and the memory use had slowly creeped up to 42.4 Mb. While this was 10 times larger than the initial 4.2 Mb, I was still saving about 75 Mb. One note about this, the memory was still very slowly creeping up by about 1 Mb per minute, maybe more or less per minute, but either way it was still creeping. I would have liked to test to see if it would creep up to the original 118.4 Mb but that would have required more than an hour and I am impatient. Another note, when I had Firefox maximized it was using 66 Mb with Flickr.com as the main tab, but 119 Mb when I quickly browsed through all my tabs and then quickly retreated back down to 66 Mb. I don’t know what causes this, but either way, for the most time it was using 66 Mb.
Now you can carry your favorite computer programs along with all of your bookmarks, settings, email and more with you. Use them on any Windows computer. All without leaving any personal data behind. Yes its true, Portable applications are now available lets see in detail

PortableApps.com provides a truly open platform that works with any hardware you like (USB flash drive, iPod, portable hard drive, etc). It's open source built around an open format that any hardware vendor or software developer can use.
What is a portable app?
portable - carried or moved with ease
app - a computer program like a web browser or word processor
A portable app is a computer program that you can carry around with you on a portable device and use on any Windows computer. When your USB flash drive, portable hard drive, iPod or other portable device is plugged in, you have access to your software and personal data just as you would on your own PC. And when you unplug the device, none of your personal data is left behind.
 No Special Hardware - Use any USB flash drive, portable hard drive, iPod/MP3 player, etc
No Additional Software - Just download the portable app, extract it and go
No Kidding - It's that easy
Consider the Possibilities...
* Carry your web browser with all your favorite bookmarks
* Carry your calendar with all your appointments
* Carry your email client with all your contacts and settings
* Carry your instant messenger and your buddy list
* Carry your whole office suite along with your documents and presentations
* Carry your antivirus program and other computer utilities
* Carry all your important passwords and account information securely
Consider the Convenience...
* Have your favorite websites handy to recommend to a friend or colleague
* Have your presentation AND the required software ready to go for that big meeting
* Have your password with you if you want to bank online while traveling
* Have utilities handy when visiting family or friends that are having PC problems
Download the Suite from hear:
Standard Package - 89.5 MB
Lite package - 30.4 MB
This software is 100% Free
The Portable Apps Suite™ is free. It contains no spyware. There are no advertisements. It isn't a limited or trial version. There is no additional hardware or software to buy. You don't even have to give out your email address. It's 100% free to use, free to copy and free to share.
For more details on this software visit PortableApps.com
Subscribe to:
Posts (Atom)

